 QuickTime is a multimedia player bundled with OS X, but it is also available for other operating systems. This media player is capable of displaying various formats of digital video, image and sound. Taking screenshot of QuickTime helps you capture the scene that appeals to you or report a tech problem. In fact, there are numerous ways to create a QuickTime screenshot. This article will show you some of the most common ways to do this job.
I.Screenshot QuickTime with Keyboard Shortcuts
II.Capture QuickTime Using Screenshot Tools
III.Built-in Screenshot Utilities to Screenshot QuickTime
I. Use Keyboard Shortcuts
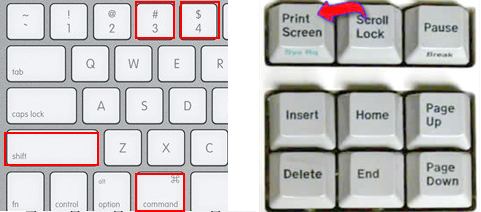
As is known to all, to screenshot on Mac, you can use the key combinations of “Command + Shift + 3/4”. And on Windows 8, you can create a screenshot just by hitting the “Print Screen” key, and the screenshot will be saved to the Pictures library. While on Windows 7, you need to use another program (Paint or Word) to save the screenshot as an image after you press the “Print Screen” key. On some laptops, you may need to press the “Fn” key and the “Print Screen” key simultaneously to activate the screenshot function. All those default ways are also workable for taking screenshot on QuickTime.
Pros: It’s easy and you don’t need to install extra software.
Cons: Screenshots made in this way are raw images without any annotations.
II. Make Use of Screenshot Tools
1. Free Screen Capture
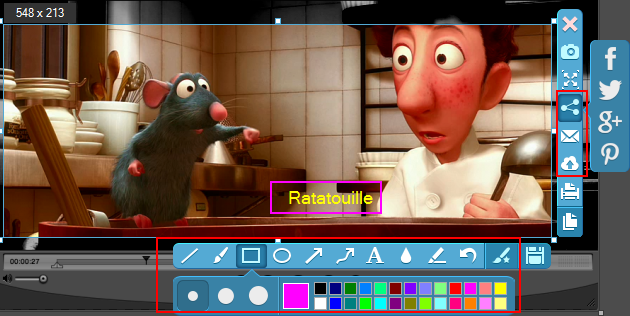
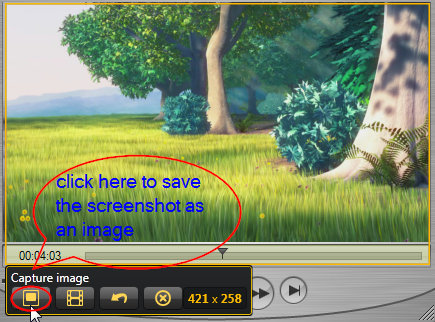
Usually, adding annotations to a screenshot enables you to make highlights or instructions for tutorials. To take a QuickTime player screenshot and edit it instantly, you can use Free Screen Capture which is a light-weight but full-featured online application. It is capable of capturing anything on the screen, including full screen, active window and particular regions. What’s more, this tool provides quick edit the moment you take a snapshot. You can blur sensitive or private information on the screenshot, and add lines, arrows, circles and texts to it. When you are done with the screenshot, you have several choices to dispose of it: save it to your local file, email it as an attachment, upload it to the Free Space run by the developer, copy it to the clipboard or share it to your social networks.
This application also has a robust pro version for you to use offline and get more useful functions. Plus it provides 10 capture modes for you to handle any screenshot. It also has two editing tools that bring flexibility to the program. Plus it has a simple recording function which is helpful in recording short video clips. You can try this program now by hitting the button below.
Pros: You can not only take a QuickTime screenshot and edit it, but also save, upload, email or share it directly.
Cons: The online version needs network. It has only 4 sharing options.
2. Jing
This software is a combination of screen capture and screen recorder. To capture a still image from QuickTime with this tool, you need to install it first. And then, there will be a little sun icon on the top edge of your screen once this application is opened. Move your mouse to the sun icon and choose the “Capture” option. Drag your mouse to select an area on QuickTime when a yellow crosshair appears. Release the mouse, then a preview of the screenshot will pop up in a simple editor which allows you to add arrows, texts, rectangles and highlights to the graph. At last, hit the “Save” button to store it to your local file.
Pros: It’s an integration of screen capture and screen recorder.
Cons: Editing options are so limited, and you have no other ways to manage the screenshot except saving it to your local disk.
III. Utilize Built-in Screenshot Utilities
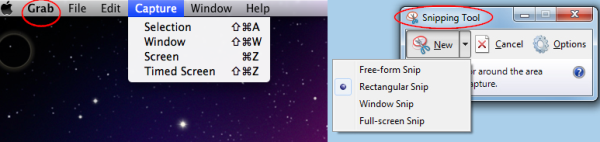
On Mac, Grab is the built-in application for you to screenshot QuickTime. It is a simple screenshot tool located under Utilities. It supports Selection, Windows, Screen and Timed Screen capture modes. This utility also offers simple editing options.
Like Mac, Windows also has its own bounded screenshot utility — Snipping Tool. This tool has four screenshot modes which are “Free-form Snip”, “Rectangular Snip”, “Window Snip” and “Full-screen Snip”. You will also have a chance to annotate the screenshot with a free-hand pen and a highlight pen. In the end, save the snapshot by clicking “Save as…” under “File” .
Pros: You don’t need to install additional application.
Cons: This program lacks rich annotating options and disposing ways.
Conclusion
This post gives you some most common ways on how to take a screenshot on QuickTime. As you can see from the pros and cons, Free Screen Capture is the best choice to do this job. Not only is it free, but also comes with a wide range of useful functions like rich editing options and multiple ways of managing the screenshot. Its Pro version even has more powerful functions, including multiple screenshot modes and various editing options.

Leave a Comment