With the development of electronics technology, more and more smartphones have been born. One of their common features is that they have a high definition built-in camera. You may love to capture thousands of images by your Android phone instead of digital camera. But the space of phone is limited, you may need to transfer photo from Android phone to PC as a backup.
If you are looking for a way, you are in the right place. In this article, I show you four methods of how to move multiple images from Android devices to computer.
Four ways of how to transfer photos from Android to computer easily
1. One click to transfer photos in bulk (Efficient way)
2. Using USB cable to transfer photos (Traditional way)
3. Fylet S secure photo transfer
4. Photo Transfer App to transfer photo without USB
Method 1: Apowersoft Phone Manager to transfer pictures from Android device to computer
Apowersoft Phone Manager is a versatile toolkit for managing various Android devices. It can receive and send SMS, deleted or export contacts, install and uninstall Android apps, manage and sync your media files between Android and PC. With this application, to transfer photos from Android phone or tablet to PC is quite handy and fast.
The step-by-step tutorial of how to transfer Android images to computer
Step 1: Launch the application on your PC and then connect your Android device via USB cable or WiFi.
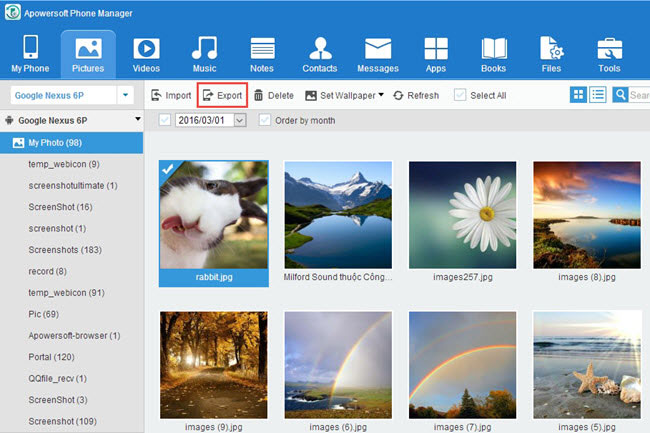
Step 2: Click “Pictures” tab, choose the photos you want to transfer and then click “Export”, as shown in the following picture.
Step 3: Save the photos in the place as you want when a window pops up.
Step 4: At last, it starts exporting photos.
Note: Please always connect your Android devices to PC during the process.
Method 2: Using USB cable
Exporting photos from Android to your computer is really easy with a supplied USB cable! Android OS is different from iOS, you can move your pictures on Android device to PC directly via USB.
The instructions on transferring photos below:
Step1: Turn on your USB debugging in the “Settings” on your phone. Connect your Android mobile phone to your PC via USB cable.
Step2: Choose the proper USB connection method.
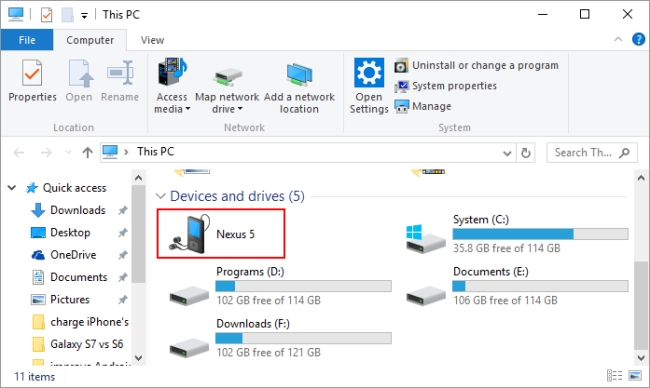
Step3: Your computer will recognize your Android and display it as a removable disk. Then please double-click the removable disk and open it.
Step4: Find and drag the photos that you need to send into your local computer.
Step5: At last, disconnect your Android after transferring Android photos to PC.
Method 3: Fylet S secure photo transfer
The third method to transfer Android photos to Windows computer is using Fylet S secure photo transfer app. It can help you download photos from Android device or find gallery files on phone or tablet and then transfer them automatically to PC. This Android app allows you to transfer unlimited number of photos and the single photo size is also unlimited. The drawback is that both devices must be in the same WiFi network.
How does Fylet S secure photo transfer work?
Step1: Before removing photos, you need to install this app on both your Android smartphone and Windows computer.
(Note: Please download Windows desktop version at http://fylet.com/d before installing it.)
Step2: Register on your Android device and sign in your PC with the same account.
Step3: When your Android device has been connected, the process of photos transfer will automatically start.
Method 4: Photo Transfer App to transfer photos from Android phone to PC without cable
Just as its name implies, Photo Transfer App for Android is the application to transfer photos. It can transfer pictures on Android devices to PC like Fylet, but also copy Android photo to iOS device or other Android device.
You can download and backup your images from Android smartphone to PC in a few seconds over WiFi without cable or other software. Apart from transferring photos, it supports transferring and sharing your videos.
You can solve the problem easily with one of the above-mentioned four methods. But by comparison, the Apowersoft Phone Manager is most efficient way if you want to transfer a large amount of pictures with one click. And it is also workable when there is no USB around. If fact, you can use it to backup Android data to PC with ease. So feel free to download it and have a try!

Leave a Comment