
ApowerREC is a multipurpose screen recording software integrated with the ability to annotate recordings, create recording tasks, upload captured videos, take screenshots and more. No matter it’s your first time using ApowerREC or just want to know more about this recorder, this guide will meet your ultimate demands along with the instructions of installation as well as technical support.
How to Use ApowerREC?
Get Started
Installation
- Download ApowerREC and double click the finished apk file to install the program.
- From the pop-up window, choose your preferred language and go ahead.
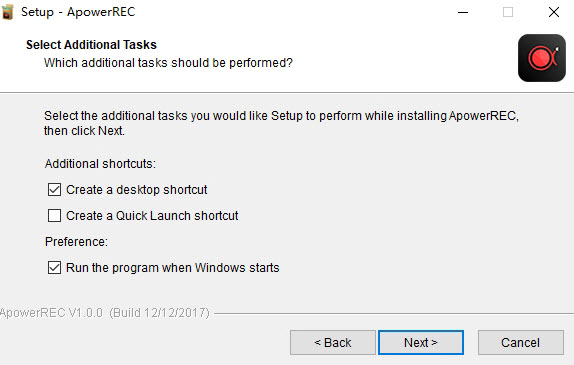
- When the “Select Additional Tasks” window shows up, kindly confirm each option and click “Next” once finished.
- The installation should be done within few seconds, and then, you can select to launch the program and click “Finish” to exit setup.

Registration and Activation
If you want to enjoy the full version rather than the trial version which has certain using limitaions, a VIP purchase is needed. If you have already had an account before the purchase, your existing account will automatically become VIP. Simply log out the account and restart the program, then, directly log into the account with your email and password is alright. For further details regarding the account registration and activation, please refre to this FAQ post.
Set Preferences
Floating Toolbar
The floating toolbar appears when the recording is started, however, you have the option to hide this toolbar during the recording in case you don’t want any other applications to be shown on the recorded screen.

Output Format
Multiple formats are also available for you to select for video output (MP4, WMV, AVI, MOV, FLV,etc.), audio output (MP3, AAC, OGG, WMA, FLAC,etc.) and screenshot output (JPG, PNG, BMP, GIF,etc.).

Output Folder
From settings, you can select a specific folder where they want to save all their recorded files, including screenshots. So, if you’re looking for a certain recording, you can go directly to this folder and locate the file easily.

Hotkeys
If you are a shorcut-key lover, hotkeys would be your best choice rather than the recording toolbar. Although the program itself has already equipped with default hotkeys, you can still change those settings and set the hotkeys according to your own preference.

Auto Stop
From the bottom right corner of the mian board, there’s an “Auto Stop” function for you to set recording time and file size before getting started, so that the recording can be stopped automatically according to your settings.
Mouse Settings
Not only you can decide how the mouse cursor will appear in the your recording, but also you can choose whether you want to hide or show the mouse clicks as well as the mouse area.

Quality Settings
It’s indeed a precise work to adjust the video quality. From ApowerREC’s video settings, various options are provided to you: Standard, High or Ultra-high quality, frame rate, bitrate and codec. And the numeric value of all these aspects depends on your PC configuration and what you are going to record.

Record Screen
Start Recording
1. Select recording area
To record full screen, just click the first icon to set the fullscreen recording mode. You can also custom a recording area by clicking the crop icon on the main panel.
2. Select audio input
Click the sound icon to choose whether to record system sound, microphone, both or no sound at all. Moreover, sound volume can be adjusted through the sound menu’s last settings option.
3. Record webcam
To record webcam along with the PC screen, just click the camera-like icon and choose your webcam device. If the program cannot detect your webcam, simply plug in the camera before starting ApowerREC, and then, relaunch the program is fine. Here, you can also change the style of camera window from the camera settings option.
4. Click “REC” button or press default hotkeys (F7) to begin the recording.
Note: If you want to record sound only, enter “Record” from top menu and choose “Audio”. From the pull-down menu, you can also choose “Around mouse” to show the area around the mouse cursor.
Floating Toolbar
During the recording, a toolbar will appear on the screen providing various options including pause/stop, screenshot, zoom and annotating features. If you don’t need the toolbar shown on your screen, just click and drag it to the edge of your PC screen and release your mouse. After that, the toolbar will hide behind the screen side and you can pull it out by putting the mouse cursor at the original place.
Annotate recording
Annotaion tools can be utilized to create a more rich content for your recording. The real-time editing options enable you to add lines, texts, arrows, rectangles or even paint on the screen while recording.
Besides, you can add serial numbers on the recorded screen as well. For people who want to make tutorial videos, this function can be put to good use.
If these are still not good enough for you, ApowerREC has this whiteboard which literally provide a whole new blank area for you to let your creativity go wild.
Zoom Recording
If you want to zoom in certain part of the recorded screen, this zoom function is definitely what you need. Simply click the icon shown in the following image to launch this function. The zoomed area will follow where your mouse cursor goes. Besides, you can always use the default hotkey (F11) to lock the zoomed window.
Split Recording
If you have extra requirements regarding the video file or the recording time, split recording feature is optional. Under the recording settings, you can choose to split the video file when the recording reaches at a certain time or when the file reaches at certain limitations.
Stop Recording
To finish recording, you can manually click the stop button at the recording toolbar or use the default hotkey (F7) to end the video.
Once the recording is done, you can right-click the video file and choose “Preview”, or, click the first icon at bottom left corner after choosing the file to enter the preview window.
Game Recording
If you are a game lover, we have an independent game recording mode for you! Simply click the game-like icon on the mainboard and click “REC” to start recording your game. Once entering the game recording, you will notice a button at the top left corner, just click that button or use the default hotkey (F7) to end the recording is fine.
Edit Recording
Trim the Video
After entering the editing mode, simply drag the two icons pointed out as below to trim the video length.
Add Intro & Outro
No matter you are making a personal video or a public video shared on social media, intro and outro can be added to the video during editing as well. Just click the icon at the bottom left side of editing panel and you will be able to enter the contents of title and subtitle.
Add Watermark
Furthermore, images and texts can also be put onto the recording. Just click the “water drop” shown in the image below and choose whether you want to add images or texts is alright.
Create Task Recording
Under top menu’s “Record” section, you will find a function called “Task scheduler”. This feature allows you to set the start time, duration, stop time, recording area, audio input and so much more for the recroding so that you don’t need to supervise the recording the whole time.
The other one is “Follow Recording”. Simply select the application that you want to follow and start recording instantly. Once the application you selected exits, the recording will be stopped and saved automatically. This feature is convenient for recording presentations and other activities since you don’t need to stop recording yourself after finishing the presentation.
A detailed guide is provided for you to know more details on “how to create task recording” with ApowerREC.
Upload videos
After recording the video, you can choose to upload it to YouTube, FTP and other platforms. To do this, simply select the video and click the upload icon shown below.
ShwoMore: To upload the video on ShowMore, just right-click the recorded video file and choose “ShowMore” under “Share” option. Then, fill in all the information at the uploading window and click “Upload” when you are finished. After this, simply log into ShowMore with your Apowersoft account to check your shared video under ShowMore’s user center is alright.
YouTube: Just like uploading the videos to ShowMore, YouTube fans can also choose YouTube to share your videos. The process is the same as above, just find “YouTube” under “Share” option after right clicking the video file, then, you will be able to start sharing the recording to YouTube.
FTP: FTP (File Transfer Protocol) is actually a network protocol which can be used to transfer files between computers. To upload your file to FTP, select “FTP”, input the host name, port, user name, password and remote directory. Click on “OK” when you finish typing all the information.
Take Screenshots
As a multi-functional program, ApowerREC also provides tools for you to take screenshots. If you want to capture any part of your screen, just go to the main panel, hit on “Tools” to find “Screenshot”, and then click it to start the capturing. After selecting the region you want to capture, you will be able to add texts, lines or shapes to the captured screen as well as to save, share or pin it.
Also, during the recording process, you can create a screenshot of the recording region by clicking on the screenshot icon on the floating toolbar, and the file will be saved automatically. You can go to the file list of “Screenshot” on the main panel to check your screenshot.
Help & Support
If you have any problem while using ApowerREC or want to send us a feedback, please kindly follow the steps below to get free help or technical support.
Community Support
No matter you are seeking for support or simply want to share some tips with other ApowerREC’s community members, just join the community and dive into our hot discussion.
Feedback & Ticket Support
To send us feedback, please enter the third icon at top right corner and choose “Feedback” under “Help” section. Kindly leave your email and describe the issue you are having with program there and send it to us. Most importanly, please do not uncheck the option of “Send log file” within the feedback so that our technician can use it to locat the program issues and find solution accordingly. And we will then get back to you as soon as the solution comes out!
Alternatively, you can also submit a ticket and describe the problems there and send it to us. We will get back to you ASAP!
Leave a Comment