ApowerPDF is a comprehensive program that capable of editing, converting, creating and viewing PDF documents. Other amazing features including managing pages, adding protection, signing and OCR. In order to have further understanding of this PDF editor and you can check below for a guide.
View & Navigate a PDF
ApowerPDF provides flexible page view modes making it a simple task to view any PDF files on your computer. You can use this as your default PDF reader.
Page Layout
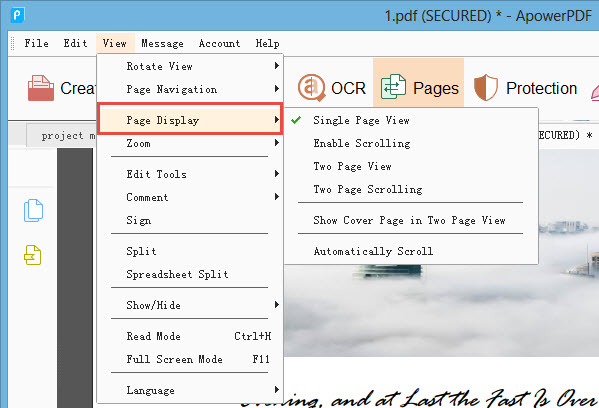
Navigating to “View”-> “Page Display”, you can easily set the desirable page layout for reading your PDF files. For example, you can select a single page view, two page view, two page scrolling, automatically scrolling etc. Besides, this program also supports rotating page view in a clockwise or counterclockwise direction.
Zoom in/out
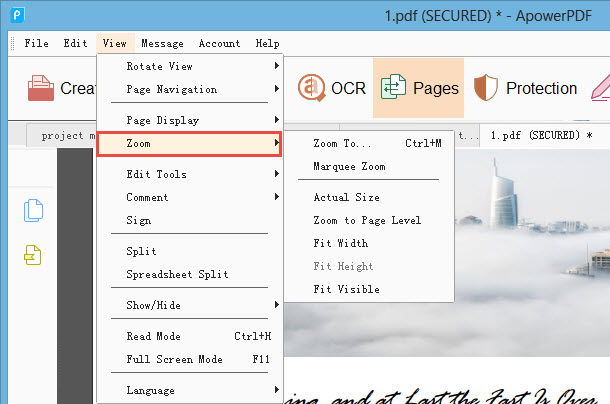
This PDF editor also enables you to adjust page magnification. Simply go to “View” on the toolbar and select “Zoom” from the menu. It offers a wide selection of page zoom levels including “Fit Width”, “Fit Visible”, “Zoom to Page Level” and many more. Plus, you can also directly choose your magnification percentage which ranges from 8% to 6400%.
The Marquee Zoom tool works by dragging a rectangle region on the page around the portion that you want to magnify. Or you can simply click this tool to increase the magnification, which centers on the point where you clicked. To decrease the zoom level, please press Ctrl and click the tool.
Navigate
ApowerPDF also provides ways for users to navigate between different pages in “Page Navigation”. You can quickly go to the first page, last page, previous page or any specific page with this function. With this, the navigation pane that is located on the left side of the main interface provides easy access to various pages.
Create a PDF
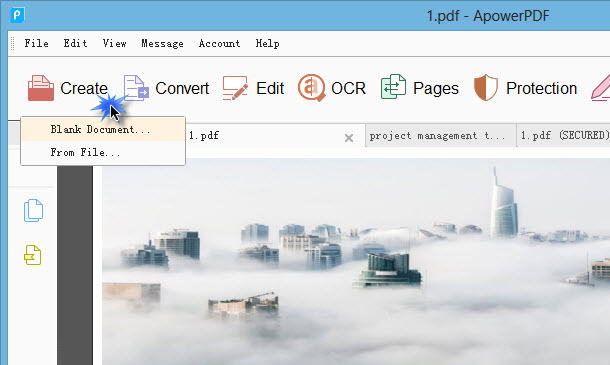
Whenever you want to create a new PDF file or even convert images or documents to PDF, you can make use of the “Create” feature. Just hit the button on the interface, and then you can create a PDF from a blank document or local files. Upon creating from local files, you can import Word, Excel, PowerPoint files or Images.
Edit a PDF
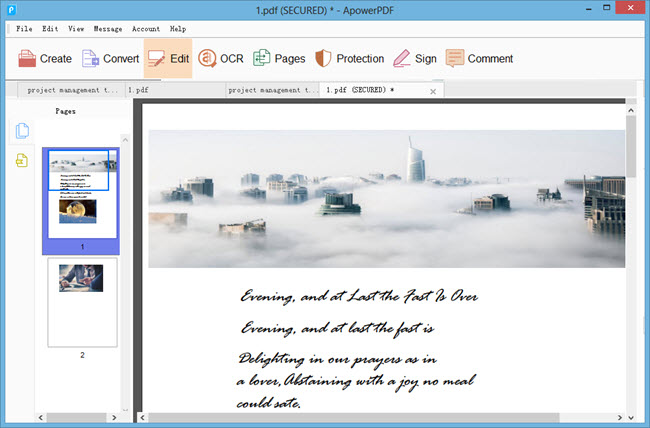
This software also comes with a variety of editing options. You can directly hit “Edit” on the toolbar to edit content and add links.
Content Editing
In this section, you can choose “Edit Text & Image” to modify the text and images of the original document. If you wish to add text into any part of the page, you can hit “Add Text”. For inserting new images, simply click “Add Image” and choose the file from your local folder. After that, you can adjust the size of image by clicking and dragging.
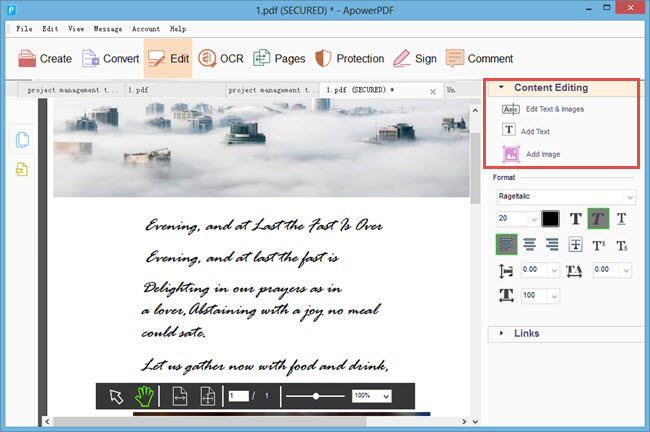
If it’s necessary, you can also adjust the font, size, color of text or even underline and turn text into bold or italic font style.
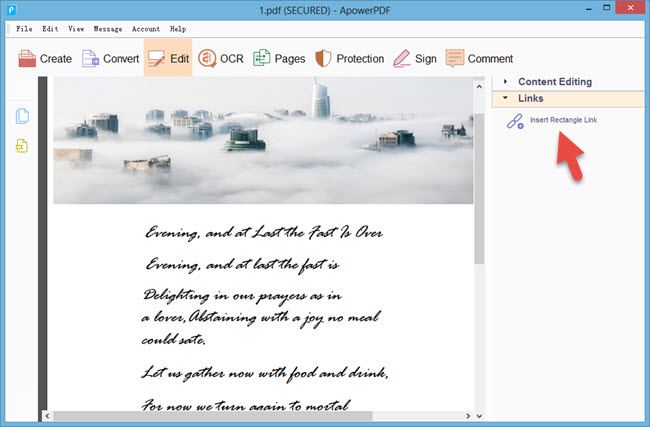
Insert links
To add links, you can click “Links”->”Insert Rectangle Link”, then drag a rectangle region on the page. Once it’s done, a window will appear asking you to customize the appearance of the link and select the destination. For instance, you can set to open a web link or go to a page view.
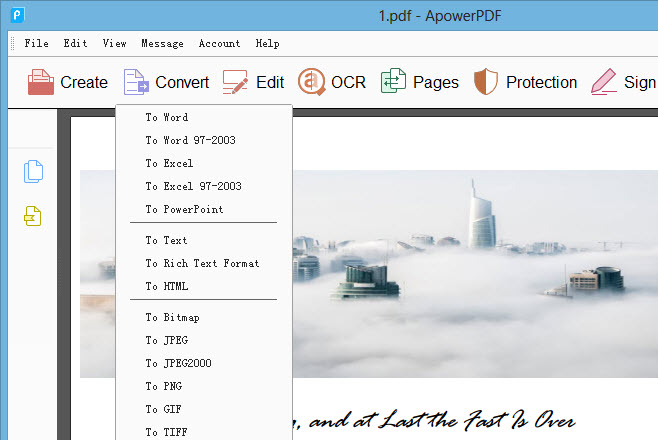
Convert PDF
This tool can also be used to convert PDFs to various documents. Just click the “Convert” icon (If it’s your first time using this feature, you need to install the converter components from here) and choose the format you like from the drop down. From there, you can select Word, Excel, PowerPoint, Text, HTML, PNG etc.
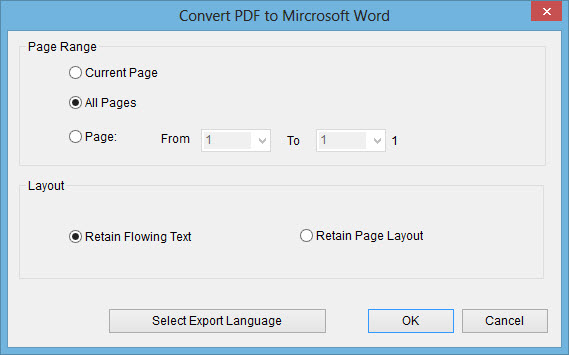
Convert PDF to Microsoft document: Select Word, Excel or PowerPoint from the menu, then a “Save As” window would pop up. You can hit “Settings” to choose page range, layout and export languages for conversion. After that, you can hit “Save” button.
Convert PDF to Images: ApowerPDF allows you to convert PDF to JPG, PNG, GIF, Bitmap and TIFF image formats. Before converting, you are also able to select the page range, resolution, colorspace as you like.
Convert PDF to Others: It also supports converting PDF files to HTML, Text and Rich Text format.
Comment PDF
For those who need to annotate PDF files, you can click “Comment”. In this function, two sections are provided for using which are annotations and drawing markups. In “Annotations”, you can easily highlight, underline, strikethrough text or even insert sticky note for better illustration and review.
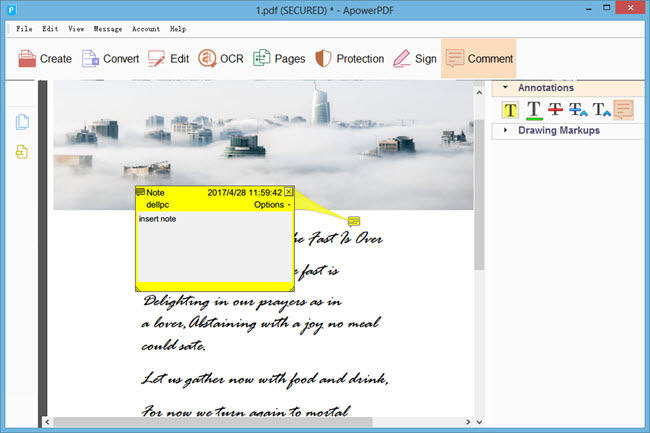
Upon drawing markups, you are allowed to add arrows, lines, ovals, rectangles and draw with pencil tool. If you want to erase parts of the drawing, simply select the eraser tool and drag across the region of the drawing that you want to remove.
Pages Management
The PDF Pages management tools are grouped under “Pages”. You can hit the button and find more tools on the right sidebar.
Manage PDF Pages
Insert from File: you can append other PDF files to the current document and choose where the pages will be added.
Insert Blank Page: insert blank page to any part of the page you want and set how many pages you want to add.
Delete: specify the page/pages that you want to delete from the whole document.
Extract: extract specific pages as separate PDF files and choose whether to delete pages after extracting.
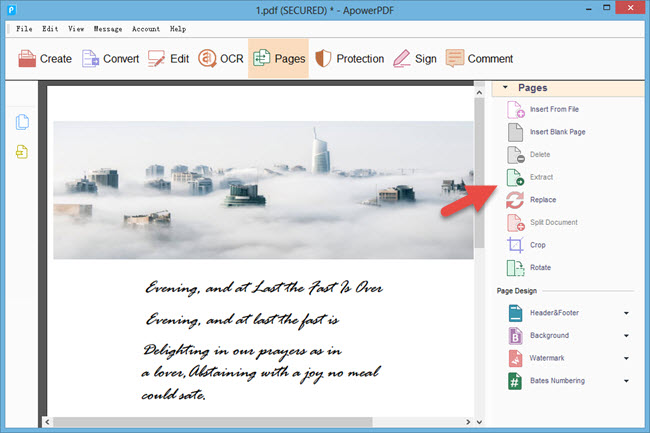
Replace: replace specific pages with a new chosen file and customize which pages to use as a replacement.
Split Document: easily split PDF document by number of pages, file size and top-level bookmarks.
Crop: drag a rectangle on the page you want to crop and then double click inside the cropping rectangle to open Crop Pages dialog box.
Rotate: customize the rotate direction and specify page range that you want to rotate permanently.
To temporarily change the page view, please select “View” -> “Rotate View” -> “Clockwise” or “Counterclockwise”. The original page orientation will be restored the next time you open the PDF.
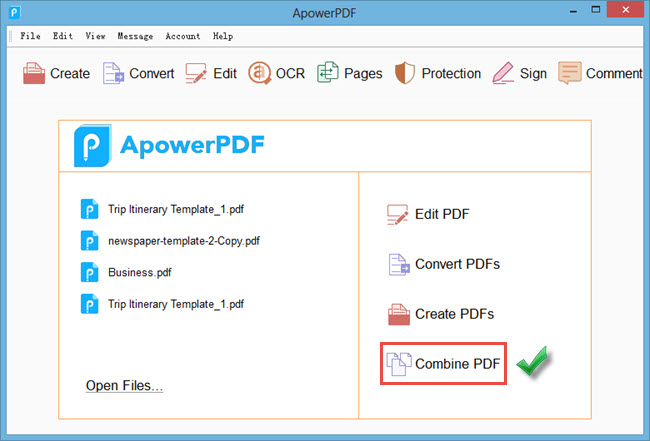
Additionally, if you desire to combine multiple PDF files into one, you can access this feature from the starter interface. To do it, simply click “Combine PDF” button. After that, a window will pop up. From there, hit the “Add Files” button on the top left of the window and select “Add Files” or “Add Folders” for combining. Once you’ve selected files, you can then see the files displayed in the list and move up/down any file as you wish. Lastly, you can click “OK” to confirm.
Adjust Page Design
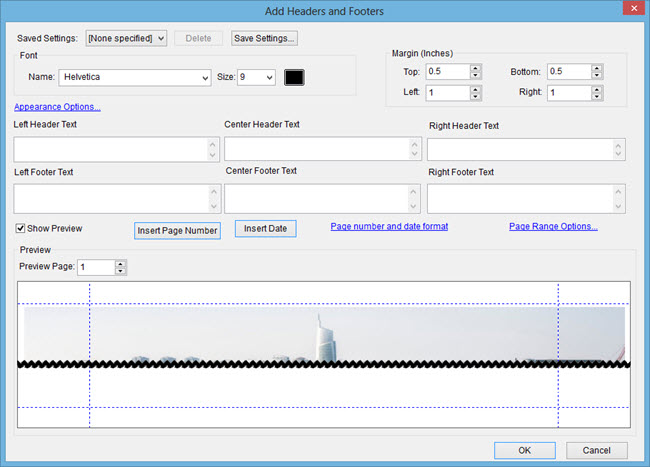
Header & Footer: you can add, update and remove the header and footer of your document. A variety of settings are provided when customizing the appearance of the header and footer.
Background: you can choose color or file as background and adjust its rotation, opacity, position and others. Plus, you’re given options to update and remove background.
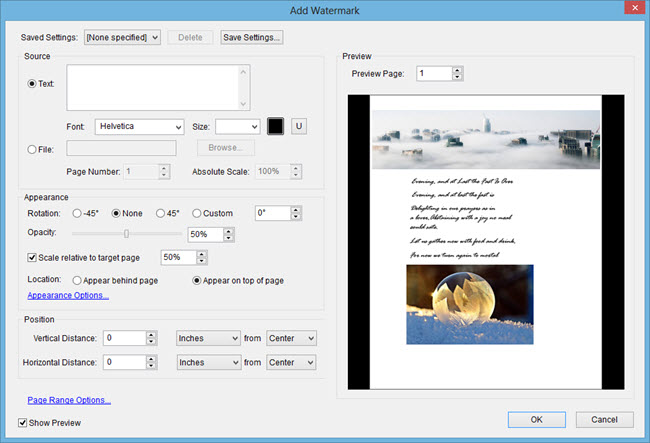
Watermark: you can easily add text or files as watermark and customize its appearance and position. If needed, you can update and remove watermark as well.
Bates numbering: two options are provided under this feature, you can either add or remove bates numbering.
Add Protection
With this function, you can secure your file with password or remove password security.
Add a password to a PDF
Choose “Protection” -> “Encrypt with Password” and you can protect your PDF documents by adding password to limit access to a PDF. This can also restrict certain features, such as printing and editing. Basically, there are two kinds of passwords that could be used to encrypt the file which are document open password and permission password.

Document Open password: a password is required to enter when opening a PDF file each time.
Permission password: using a permission password, you can open PDF file without any password, however, a password is required when changing permission settings. Plus, you can restrict printing, editing, signing and copying content in the PDF.
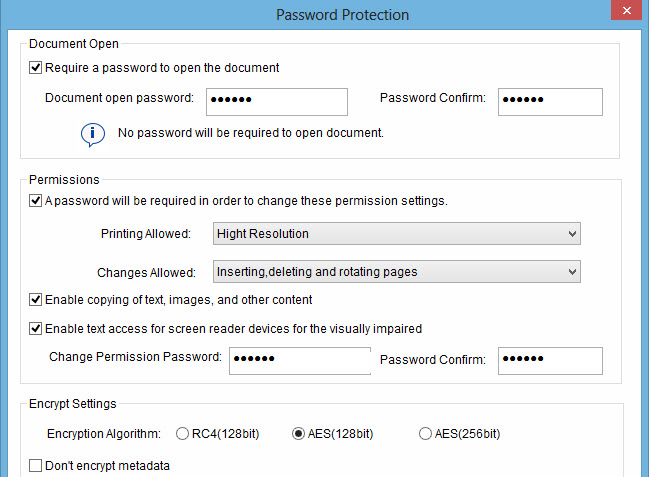
And please note that the two types of passwords cannot be same.
Remove password security
To remove security from a PDF file, you must have the permission and password to do so. If your document is encrypted with permission password, but you forget the password, then you can’t remove security with any PDF editors.
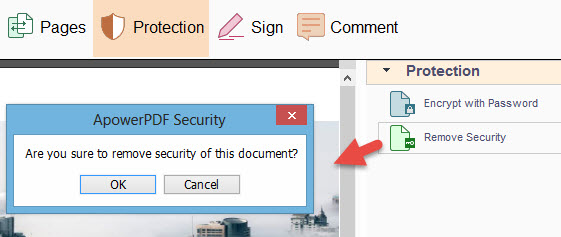
Once you open the PDF, you can forward to “Protection”-> “Remove Security” button, type the permission password and then remove password security. If the document only has a Document Open password, you can directly remove password protection without typing password.
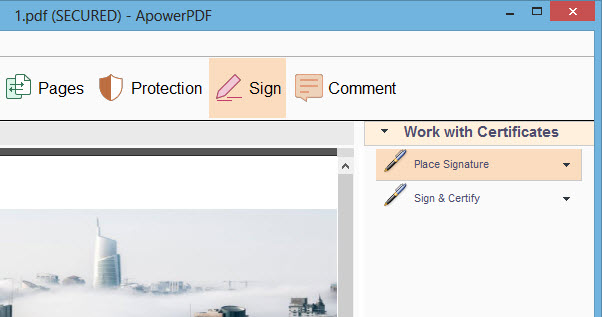
Sign a document
ApowerPDF also makes it easy to sign documents electronically. This differs from traditional handwritten signatures, digital signatures often contain additional information, such as the location, date & time of signature and the reason for signing.
To sign a PDF, please choose “Sign” tool from the top toolbar and then select “Place Signature” from the right menu bar. Next, hit “Drag New Signature Rectangle” button, click and drag your mouse to draw a rectangle on the page and then release your mouse.
If you don’t have a digital ID for signing, then you have to create a new ID with this program. To create a self-signed digital ID, choose “New ID” from the dropdown menu of “Sign As” and then select “A new digital ID I want to create now”. Hit “Next” to continue and check both of the options when selecting where to store your self-signed digital ID. Once it’s done, you can enter your identify information to generate a self-signed certificate.
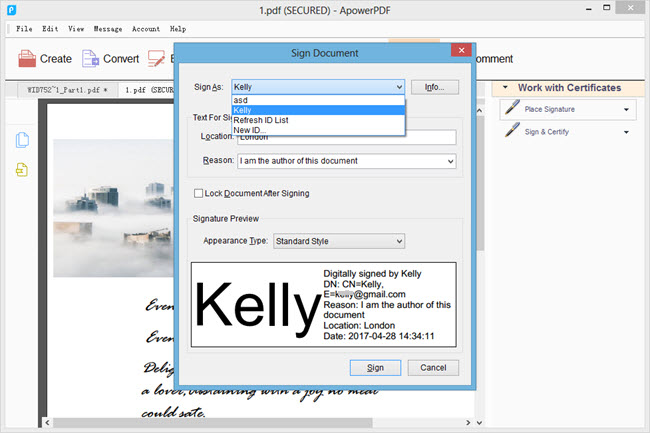
After filling the required information, you will be directed back to “Sign Document” window. From here, you can select reason for signing and customize signature appearance. Lastly, hit “Sign” to confirm.
If you want to sign and certify your document, please select “Sign & Certify” from the right sidebar and choose the desirable option you want. The following steps are the same as what introduced above.
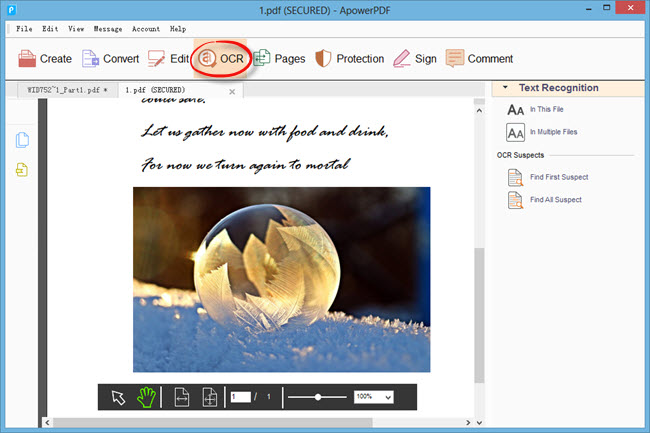
Perform OCR
OCR stands for Optical Character Recognition, which supports converting scanned documents, PDF files or images into machine-readable and editable text. Just open the doc in ApowerPDF and install OCR components when first time using it. After that, you can select the Text Recognition tab from thesidebar and then click the “In This File” button.
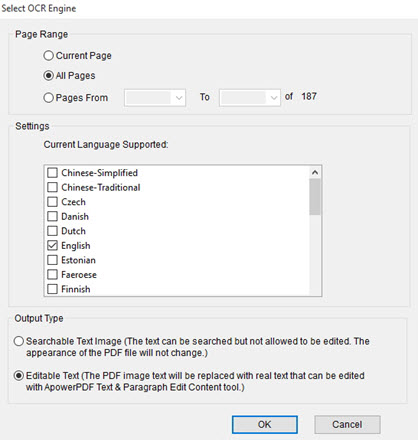
Next, select the pages you want to perform OCR and choose an OCR recognized language. Regarding the output type, you are allowed to output recognized text into “Searchable Text Image” or “Editable Text”. Please note that only the “Editable Text” output type allows for content editing. Then click on “OK” icon and you can get your text recognized.
The text recognition method can also be used in multiple files. Simply click “In Multiple Files” on the sidebar and add folder or files you want to apply OCR feature. Next, you can configure some output settings such as target folder and file naming. After that, you can select OCR language, output type and hit “OK” to forward.
If you encounter any issues when using this PDF software, you can directly go to “Help”-> “Feedback” on the interface and write down details of the issue, then click “Submit” for technical support.
Leave a Comment